android AlertDialog(アラートダイアログ)を少し改良する
今回は、androidのAlertDialog(アラートダイアログ)を少しだけ改良する方法を書きます。
※専門的には、カスタムダイヤログと呼ばれている・・・と思います(笑)
通常のAlertDialog(アラートダイヤログ)ですと、このように書くと思います。
        AlertDialog.Builder alertDialog=new AlertDialog.Builder(this);

        // ダイアログの設定
        alertDialog.setTitle("たいとる");          //タイトル
        alertDialog.setMessage("ないよう");      //内容

        alertDialog.setPositiveButton("おーけー", new DialogInterface.OnClickListener() {

            public void onClick(DialogInterface dialog, int which) {
               //「おーけー」ボタンが押された時の処理
            }
        });

        // ダイアログの作成と表示
        alertDialog.create().show();
実行結果

では、AlertDialog(アラートダイヤログ)を少し改良して、EditTextやCheckBoxなどを入れたいと思います。
やり方は、アラートダイヤログに表示したいレイアウト (xml) を定義して、それをアラートダイヤログに設定するというものです。
では、書いていきます。
①レイアウトリソース (xml) の定義
初めに、アラートダイヤログに表示したいレイアウト(xml)を作ります。
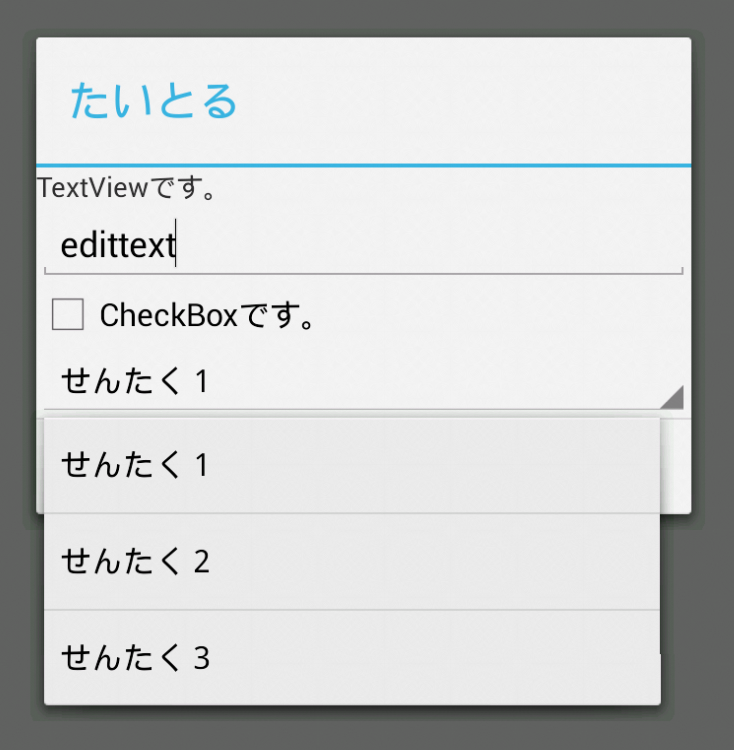
今回は、TextView, EditText, CheckBox, Spinnerを使ったレイアウトを作りました。
こんな感じです↓
dialog.xml
<?xml version="1.0" encoding="utf-8"?>
<LinearLayout xmlns:android="http://schemas.android.com/apk/res/android"
    android:layout_width="match_parent"
    android:layout_height="match_parent"
    android:orientation="vertical"
    android:id="@+id/alertdialog_layout">

 <TextView
    android:layout_width="wrap_content"
    android:layout_height="wrap_content"
    android:text="TextViewです。"
  />

  <EditText
    android:id="@+id/edittext"
    android:layout_width="match_parent"
    android:layout_height="wrap_content"
  />

   <CheckBox
        android:id="@+id/checkbox"
        android:layout_width="fill_parent"
        android:layout_height="wrap_content"
        android:text="CheckBoxです。"
    />

   <Spinner
        android:id="@+id/spinner"
        android:layout_width="match_parent"
        android:layout_height="wrap_content"
        android:prompt="@string/Prompt"
        android:entries="@array/Entries"
        />

</LinearLayout>
②ソースの定義
レイアウト(xml)をアラートダイヤログに設定します。
やり方は、こんな感じです↓
   // カスタムビューを設定
        LayoutInflater inflater = (LayoutInflater)this.getSystemService(LAYOUT_INFLATER_SERVICE);
        final View layout = inflater.inflate(R.layout.dialog,(ViewGroup)findViewById(R.id.alertdialog_layout));

        // アラーとダイアログ を生成
        AlertDialog.Builder builder = new AlertDialog.Builder(this);
        builder.setTitle("たいとる");
        builder.setView(layout);
        builder.setPositiveButton("おーけー", new OnClickListener () {
            public void onClick(DialogInterface dialog, int which) {
                // おーけー ボタンクリック処理
                EditText id = (EditText)layout.findViewById(R.id.edittext);

                CheckBox checkBox = (CheckBox) layout.findViewById(R.id.checkbox);

            }
        });
        builder.setNegativeButton("きゃんせる", new OnClickListener() {
            public void onClick(DialogInterface dialog, int which) {
                // きゃんせる ボタンクリック処理
            }
        });

        // 表示
        builder.create().show();
実行結果1

実行結果2

注意が必要なのは、ここかな。
final View layout = inflater.inflate(R.layout.dialog,(ViewGroup)findViewById(R.id.alertdialog_layout));
「 inflater.inflate(R.layout.dialog,・・・」の「R.layout.dialog」は①で作ったレイアウト(xml)の名前です。
で、「findViewById(R.id.alertdialog_layout));」の「R.id.alertdialog_layout」は、①で作ったレイアウト(xml)の「android:id="@+id/alertdialog_layout"」です。
次に、注意が必要なのは、
CheckBox checkBox = (CheckBox) layout.findViewById(R.id.checkbox);
この「layout.findViewById」の部分です。
この部分は、通常ですと、
(CheckBox) findViewById(id.checkbox);
このようになっていると思います。(findViewByIdの前に「layout.」みたいなものがついていない)
必ず、
final View layout = inflater.inflate(R.layout.dialog,(ViewGroup)findViewById(R.id.alertdialog_layout));
ここ↑で定義したViewをfindViewByIdの前につけてください。
通常と同じ書き方でやると、エラーが出るので注意してください。
あと、背景色なども変更できます。

<?xml version="1.0" encoding="utf-8"?>
<LinearLayout xmlns:android="http://schemas.android.com/apk/res/android"
    android:layout_width="match_parent"
    android:layout_height="match_parent"
    android:orientation="vertical"
    android:id="@+id/alertdialog_layout"
    android:background="#f0e68c">
他にも、いろいろカスタマイズできます。角丸にするとか・・・
これで、終わります。
参考サイト
カスタムダイアログ | Androidアプリ開発入門
Androidでの警告画面を表示するアラートダイアログの使い方 | Tech Booster